Serving Notion Presigned Images with Cloudflare Workers
I recently made a pretty big change on my website. For the first time ever, my posts don’t live in Markdown files. Instead, they’re all in Notion, the tool I’ve been using to draft posts for quite some time now. It’s nice being able to have a top-notch writing experience without the need to perform a clunky Markdown export when it’s finally time to publish.
Most of the migration was pretty boring & straightforward, but there was a particular piece of it that was interesting to navigate: serving images.
If you look at the underlying URL of any image in Notion, you’ll notice it’s presigned, and after a fixed number of hours has passed, that URL will expire. This posed a challenge. My site is statically generated with Next.js, and if I directly embedded those raw Notion links, my images would all cease to work after a while.
I needed a cheap solution that wouldn’t require a painfully complicated process to set up. Thankfully, CloudFlare has some handy tools in its suite for pulling this off.
The Panacea that is Cloudflare
There are two distinct problems to solve here, each of which paired nicely with one of Cloudflare’s offerings.
First, whenever one of my pages containing images is viewed, I needed to intercept each image request in order to serve it from a location that’s not Notion. A Cloudflare Worker is perfect for this job. Workers operate at the edge, so you can run server-side code with a similar level of performance as serving a static file from a CDN. Plus, the free tier is generous and the developer experience is buttery smooth.
Second, I needed a place to put those images before they’re served on my site. Not long ago, Cloudflare introduced a tempting alternative to Amazon’s S3 product — R2 Object Storage. It touts zero egress fees (meaning it’s dirt cheap if you’re largely just reading static assets), and an API that’s fully compatible with S3 (bonkers). I knew this would mesh nicely with what I was aiming to do.
The Build
With these tools at my disposal, here’s how I set it up:
Step #1: Upload images on site build.
It’s nice that R2 is compatible with AWS, because all this meant was installing the aws-sdk, configuring it with my Cloudflare access key, and setting up the code to upload images when my Next.js site is built. This process involved two main parts.
Determining Image Keys
First, I determined the key by which I’m save each image by hacking apart the URL embedded within my Notion posts. In raw form, they look something like this:
https://s3.us-west-2.amazonaws.com/secure.notion-static.com/d527ddf8-acdc-4284-914d-8d4fefeda507/Untitled.png?X-Amz-Algorithm=AWS4-HMAC-SHA256&X-Amz-Content-Sha256=UNSIGNED-PAYLOAD&X-Amz-Credential=AKIAT73L2G45EIPT3X45%2F20221016%2Fus-west-2%2Fs3%2Faws4_request&X-Amz-Date=20221016T223440Z&X-Amz-Expires=86400&X-Amz-Signature=841d76d1a556204dc3d9c5a3d838913e3409224fe6d070a92fc9a9738918479e&X-Amz-SignedHeaders=host&response-content-disposition=filename%20%3D%22Untitled.png%22&x-id=GetObject
I chose to use the random-looking string of characters immediately following the hostname. This would be the unique identifier by which I upload each image to R2:
function extractKey(imageUrl: string): string {
    const url = new URL(imageUrl);
    const parts = url.pathname.split("/");

    return parts[parts.length - 2];
}

const key = extractKey(
	"https://s3.us-west-2.amazonaws.com/secure.notion-static.com/d527ddf8-acdc-4284-914d-8d4fefeda507/Untitled.png?X-Amz-Algorithm=AWS4-HMAC-SHA256&X-Amz-Content-Sha256=UNSIGNED-PAYLOAD&X-Amz-Credential=AKIAT73L2G45EIPT3X45%2F20221016%2Fus-west-2%2Fs3%2Faws4_request&X-Amz-Date=20221016T223440Z&X-Amz-Expires=86400&X-Amz-Signature=841d76d1a556204dc3d9c5a3d838913e3409224fe6d070a92fc9a9738918479e&X-Amz-SignedHeaders=host&response-content-disposition=filename%20%3D%22Untitled.png%22&x-id=GetObject"
);

// key: 802f4ae5-100d-4ce1-9912-82fe84b11733
Conditionally Upload Based on Key
Once the key was determined, it was time for the upload itself, which I bypass if the upload has already occurred. I wrote a StaticAssetService class to perform this work, which uses R2 as a provider responsible for hosting those assets. The interesting part of that code looks like this. Feel free to dive in more here.
async put(imageUrl: string, key: string): Promise<any> {
  try {
    // I've already uploaded an image with this key! Don't do it again.
    if (await this.get(key)) {
      return Promise.resolve();
    }
  } catch (e) {
    console.error(`Retrieval failed! Key: ${key}, url: ${imageUrl}`);
  }

  try {
		// Upload the image!
    return this.provider.uploadImage({
      imageUrl,
      key,
    });
  } catch (e) {
    console.error(`Upload failed! Key: ${key}, url: ${imageUrl}`);
    return Promise.resolve();
  }
}
Important: Setting the Correct Content-Type
There’s one gotcha worth calling out regarding this process. By default, binary/octet-stream is set as the content type upon upload (rather than something like image/png), which would prevent the image from rendering when it’s finally served. The solution is to set that type on each upload, based on file you’re attempting to process. Here’s a closer look at that uploadImage method:
async uploadImage({ imageUrl, key }: { imageUrl: string; key: string }) {
    const res = await fetch(imageUrl);
    const blob = await res.arrayBuffer();

    return s3
      .upload({
        Bucket: BUCKET_NAME,
        Key: key,
        Body: Buffer.from(blob),

				// Set the correct `ContentType` here!
        ContentType: res.headers.get("Content-Type") as string,
      })
      .promise();
  }
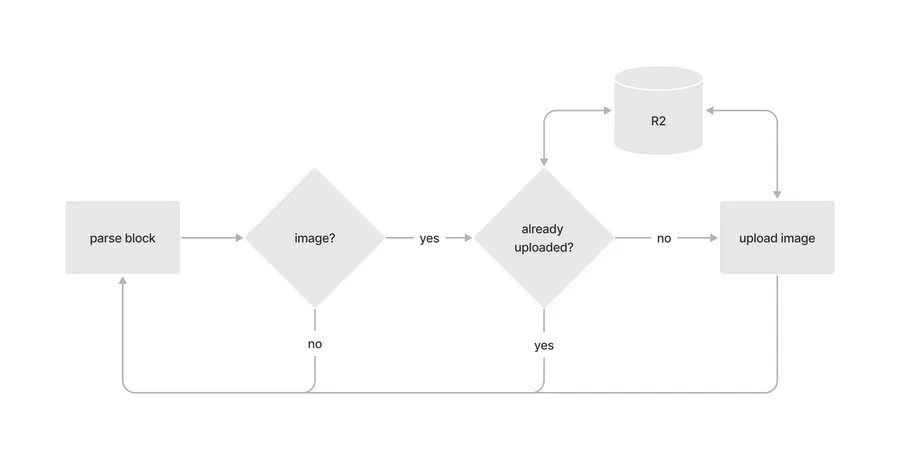
A special shout-out is due to the participants of this GitHub issue for helping resolve this. With that piece in place, I can see every new upload appear in Cloudflare after I build my site:

The entire process can be represented like so:
Step #2: Rewrite image URLs before generating HTML.
You can only use a worker to intercept requests on your own domain set up with Cloudflare. So, if I wanted to handle my images in a certain way when they’re requested (like swap them out with an image from R2), I’d need to make it look like they belong to my domain before I build my HTML. I landed on transforming each presigned URL into a relative path with the following pattern: /proxy/IMAGE_ID. My worker would then be configured to listen for requests to this path and do as I see fit.
Writing the Pattern
In order to perform this URL transformation, I used a regular expression that would swap out the presigned URL with my /proxy/IMAGE_KEY path, using the image key I extracted earlier.
The image “block” I’d get from Notion each time is composed of normal Markdown, containing an optional “alt” description and the long, presigned URL.

In order to preserve that description while I update the path, I used the following pattern:
!\[(.*?)\]\((.*)\)
Here’s a brief breakdown of that pattern:
| Pattern Part | Description |
|---|---|
!\[(.*?)\] |
Captures the “alt description” between square brackets, so I could preserve it in my updated markup. |
\(.*\) |
Matches against the remaining URL between parentheses, in order to replace it with an updated path. |
Finally, I used .replace() to perform the operation:
let key = keyExtractedEarlierInTheBuild();
let updatedMarkdownImage = originalMarkdownImage.replace(
/!\[(.*?)\]\(.*\)/,
``
);
Now that my images would all attempt to be requested from my own domain, I could finally set up a worker to intercept and pull them from R2.
#3. Intercept Image Requests with a Worker
One of the reasons this solution works so well is due to Cloudflare Workers’ first-class integration with R2. As such, the flow for my worker isn’t complex and can be visualized by the following sequence diagram:
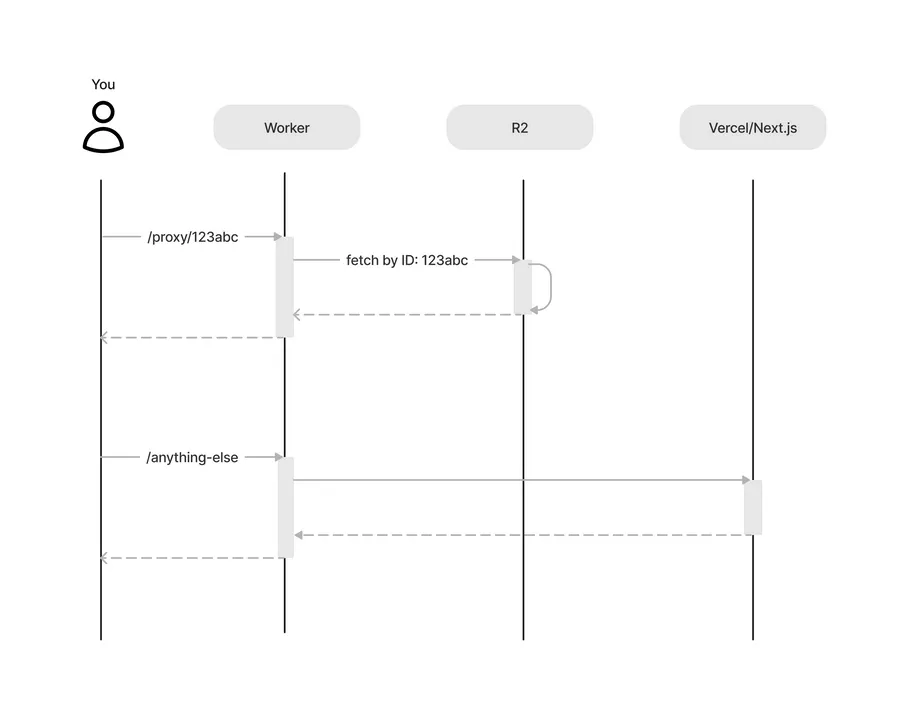
In words, any given request is handled like so:
- For image requests (those made to
/proxy/IMAGE_ID), intercept and return the the image by the embedded path ID from R2. - For all other requests, allow the request to pass through to my site on Vercel.
Setting Up My Worker
While you can write it directly in the browser, I chose to use Wangler to build & experiment with my worker locally. There’s a learning curve, but it’s minimal, and eased by the fact that Cloudflare Workers are built on the fetch API. If you’ve spent a decent amount of time with it in the browser, it won’t take long to feel at home with it here too.
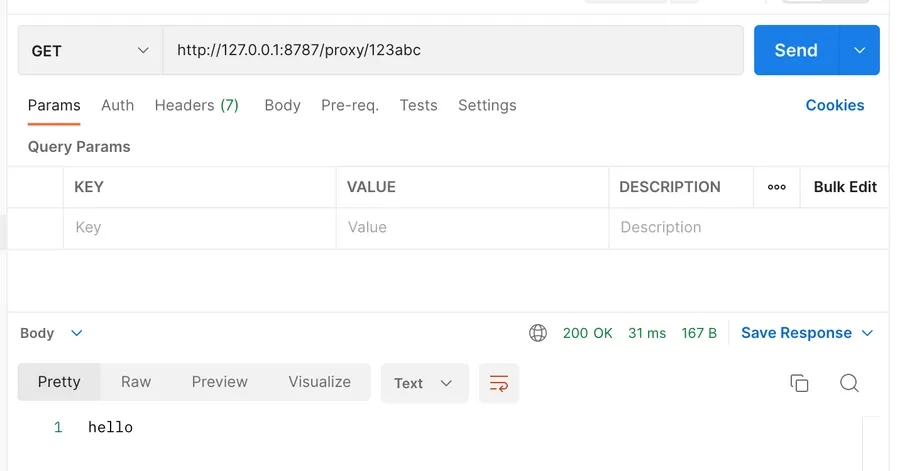
My worker is simple — consisting of only one “route,” set up with itty-router. Starting from scratch, it first looked something like this:
import { Router } from "itty-router";

const router = Router();

router.get(
  "/proxy/:imageId",
  async (request: Request, env: AppEnv, ctx: ExecutionContext) => {
		return new Response("hello");
  }
);

export default {
  async fetch(
    request: Request,
    env: AppEnv,
    context: ExecutionContext
  ): Promise<Response> {
		// If an exception is thrown, hit the origin server.
    context.passThroughOnException();

    return router.handle(request, env, context).then(response => response);
  }
};
When any request hits my worker, it’ll try to match against that /proxy/:imageId endpoint. If it doesn’t, the request will be forwarded to the origin server like normal (in this case, Vercel, where my site is hosted). But if it does match, the request will be intercepted and returned with a new Response():
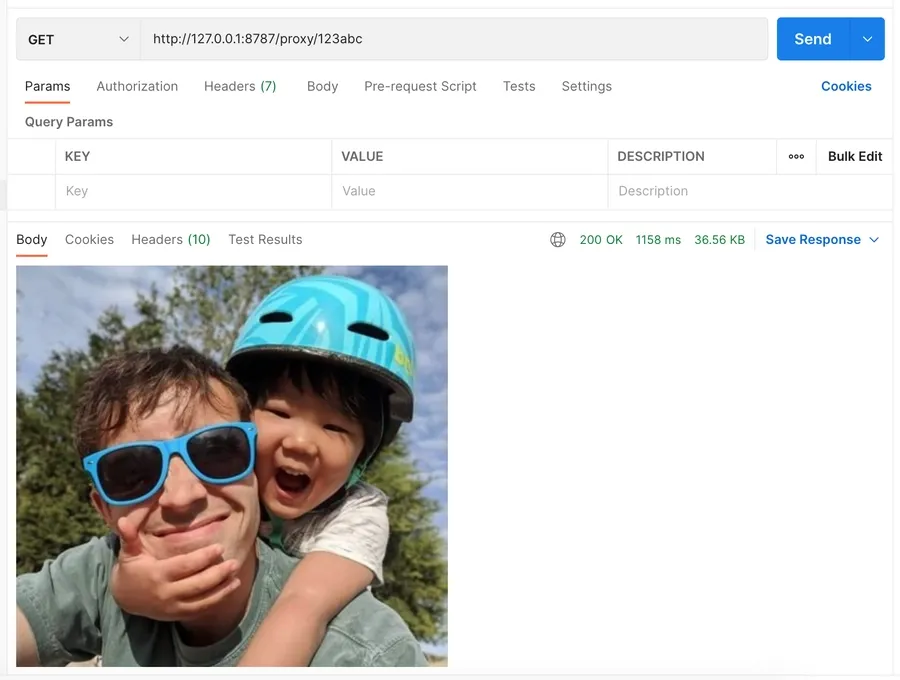
Retrieving an Image from R2
After that, I took it to the next level by integrating with R2. Each request comes in with an imageId that corresponds to an image that was previous uploaded to R2. Cloudflare makes it easy to connect a bucket of your choosing to your worker. That meant creating a binding in my wrangler.toml file, which specifies the buckets I use in production & development:
# ... the rest of my wrangler.toml

[[ r2_buckets ]]
binding = 'MACARTHUR_ME'
bucket_name = 'macarthur-me'
preview_bucket_name = 'macarthur-me-dev'
Then I could use that binding to fetch objects in my worker:
import { Router } from "itty-router";

interface AppEnv {
  MACARTHUR_ME: R2Bucket;
}

interface IRequest extends Request {
  method: "GET";
  url: string;
  params: { imageId: string }
}

const router = Router();

router.get(
  "/proxy/:imageId",
  async (request: IRequest, env: AppEnv, ctx: ExecutionContext) => {
		const { imageId } = request.params;

		// Fetch the image by ID:
    const obj = await env.MACARTHUR_ME.get(imageId);

    if (!obj) {
      return new Response(`Image not found: ${imageId}`, { status: 404 });
    }

    return new Response(obj.body);
  }
);
After that, the result of my request yielded a different result:
Setting up Client Headers
After that, I just needed to adjust a couple headers on response sent to the browser. The first was “Content-Type,” which ensures that browsers can correctly serve images, and the second is “Cache-Control,” which tells clients they’re permitted to locally cache the image for up to a year.
router.get(
  "/proxy/:imageId",
  async (request: IRequest, env: AppEnv, ctx: ExecutionContext) => {
    // ...

+   const response = new Response(obj.body);

+   const headers = {
+     "Content-Type": obj.httpMetadata!.contentType as string,
+     "Cache-Control": "public, max-age=31560000",
+   };

+   const response = new Response(obj?.body, { headers });

    ctx.waitUntil(caches.default.put(cacheKey, response.clone()));

    return response;
  }
);
This met minimal needs, but it could be improved with one more small caching optimization…
Setting up Object Caching
In addition to being able to tell the client how to cache an asset, workers can leverage a proprietary cache provided by Cloudflare. It provides a simple key/value interface, which uses a (cloned) request as the cache key. When a request comes in, if we already have a response matching that request, we can return that. And if not, the image is fetched from R2 and stuck into the same cache for later.
router.get(
  "/proxy/:imageId",
  async (request: IRequest, env: AppEnv, ctx: ExecutionContext) => {
    const { imageId } = request.params;

    // Create a cache key from existing request.
    const cacheKey = new Request(request.url.toString(), request);
    const cachedImage = await caches.default.match(cacheKey);

    if (cachedImage) {
      console.log(`Cache HIT for ${imageId}`);
      return cachedImage;
    }

    // ... other code for retrieving the image ...

    const response = new Response(obj.body, { headers });

    // Save the response to cache.
    ctx.waitUntil(caches.default.put(cacheKey, response.clone()));

    return response;
  }
);
It’s nothing world-changing, but should reduce the number of requests to my R2 bucket. And I’m all for some free micro-optimization.
Just the Beginning
This was my first experience dabbling with a Cloudflare Worker. Up until now, the use cases all felt pretty hypothetical. But now that I’ve personally found value in using one to solve a problem, I imagine it won’t be long before I reach for one again — especially with the wide range of capabilities they empower.
If you’d like to dig into what’s here a little more, check out these links:
Hoping this encourages you to try one out for yourself!
Get blog posts like this in your inbox.
May be irregular. Unsubscribe whenever.